
Are you ready to take a closer look at the inner workings of a microscope? Well, hold onto your lab coat because we’re about to embark on a fascinating journey into the realm of microscopic exploration.
As you embark on this scientific adventure, you’ll discover the intricate parts and functions that make up a microscope, allowing us to peer into a world unseen by the naked eye.
From the structural components that provide stability to the optical mechanisms that enhance image quality, each part plays a crucial role in unlocking the mysteries of the microscopic universe.
So, grab your magnifying glass and join us as we uncover the secrets behind the parts of a microscope and their functions, accompanied by a helpful labeled diagram for easy reference.
Structural Parts and Functions
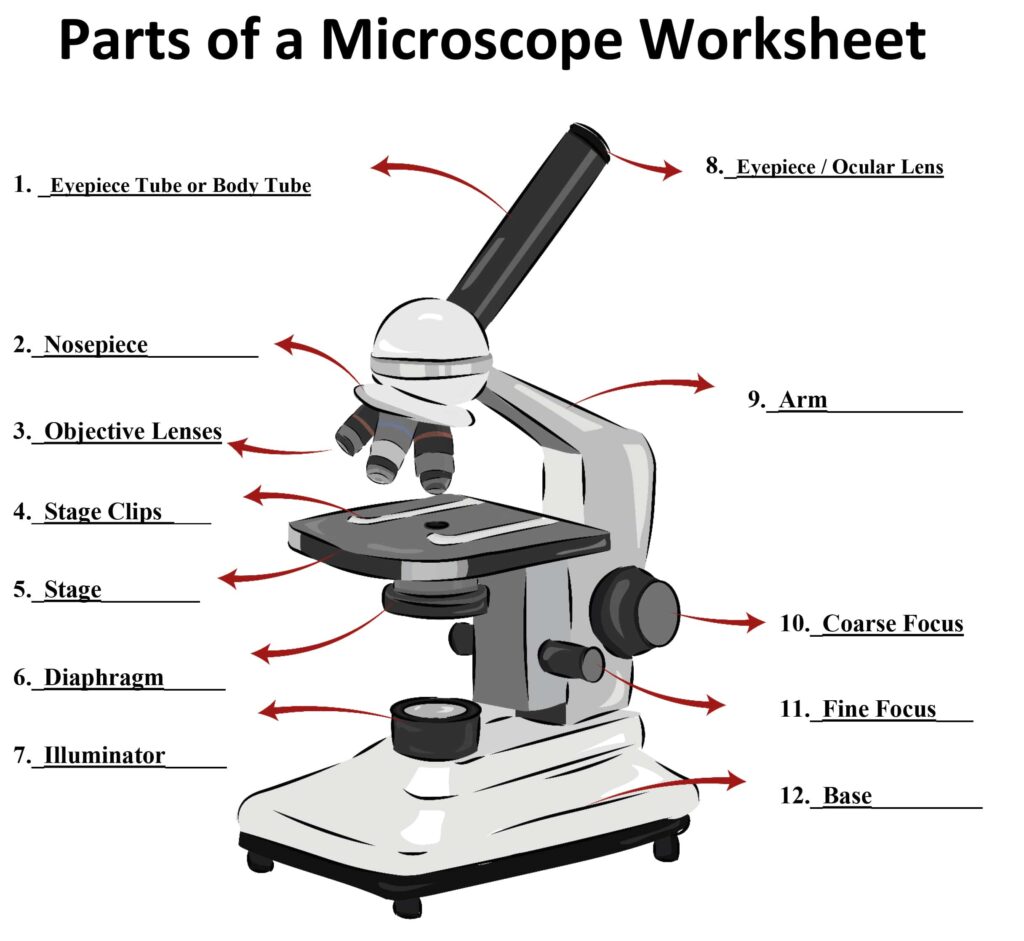
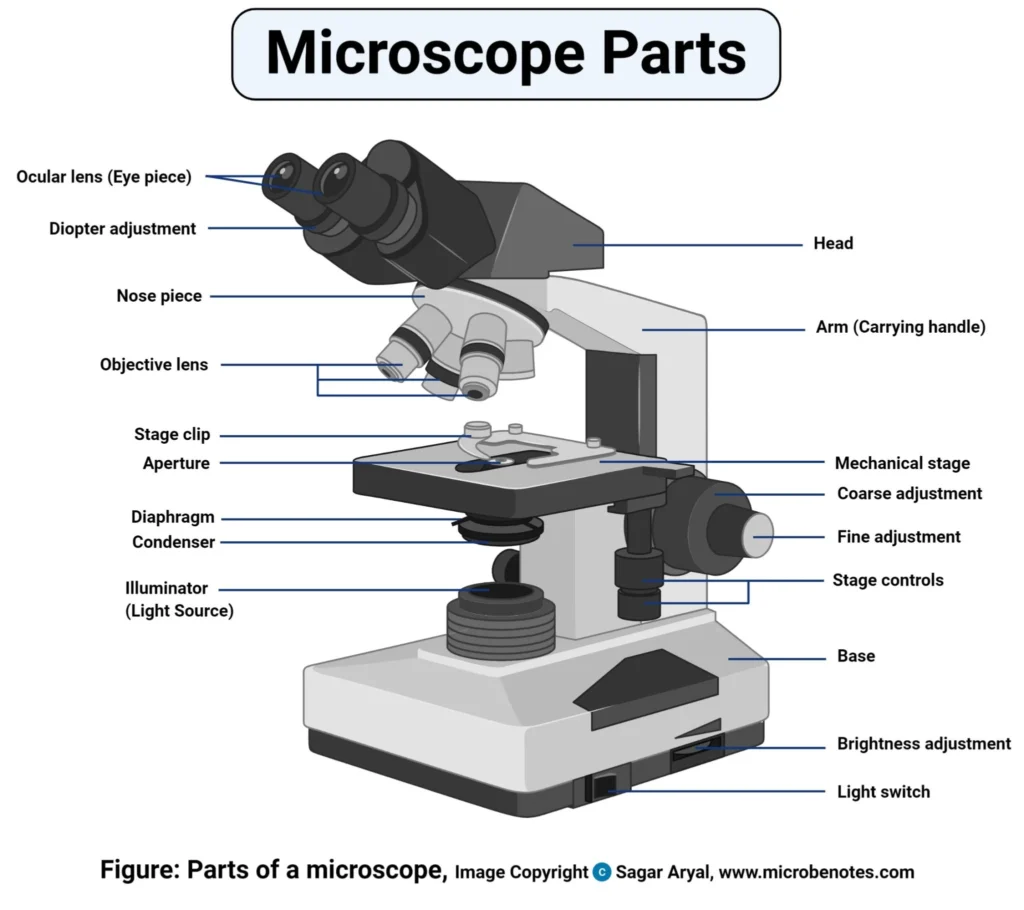
The structural parts of a microscope, including the head, arm, and base, play crucial roles in supporting and stabilizing the microscope during use.
The head holds the eyepiece lens and connects to the nose piece, allowing you to comfortably view the specimen.
The arm connects the base to the head, providing stability and allowing you to easily maneuver the microscope.
The base, on the other hand, supports the entire microscope structure, ensuring that it remains steady during observations.
These structural parts work together to create a sturdy and reliable microscope. Without them, the microscope would be unstable and difficult to use effectively.
The head allows you to view the specimen with ease, while the arm and base provide the necessary support for smooth movement and accurate observations.
It’s important to ensure that these structural parts are properly maintained and in good condition to ensure the overall functionality of the microscope.
Optical Parts and Functions
To understand how a microscope functions, it’s important to explore the optical parts and their respective functions. The eyepiece, located at the top of the microscope, is used to look at the specimen. It’s connected to the eyepiece tube, which holds the eyepiece above the objective lens. In binocular microscopes, there’s a diopter adjustment that allows you to change focus on one eyepiece. The nose piece houses all the objective lenses and can be rotated to change magnification. The objective lenses themselves are closest to the specimen and magnify the image.
In addition to the optical parts directly related to the viewing of the specimen, there are also adjustment knobs and stage control features. The fine adjustment knob is used for fine-tuning and sharpening the image, while the coarse adjustment knob is used for focusing under low power magnification. The stage control knobs allow you to move the stage mechanically, where the specimen is placed for viewing. The stage also has an aperture, which is a hole for transmitted light.
Other important optical parts include the microscopic illuminator, which provides the light source for the microscope, and the condenser, which focuses light onto the specimen. The iris diaphragm controls the amount of light passing through the condenser. The mechanical stage allows you to control the slides using mechanical knobs, while the rack stop limits the movement of the stage. Finally, there’s a light switch and brightness adjustment that control the illumination of the microscope.
Understanding these optical parts and their functions is crucial for effectively using a microscope.
Adjustment Knobs and Stage Control
Now let’s explore the adjustment knobs and stage control features of a microscope to further understand how to effectively use it.
The adjustment knobs are an important part of the microscope that allow you to focus and sharpen the image of the specimen. The fine adjustment knob is used for fine-tuning the focus, while the coarse adjustment knob is used for initial focusing under low power magnification. By using these knobs, you can achieve a clear and detailed view of the specimen.
In addition to the adjustment knobs, the stage control is another crucial feature of the microscope. The stage is where the specimen is placed for viewing. The stage control knobs allow you to move the stage mechanically in different directions, enabling you to position the specimen and bring different areas into focus. This is particularly useful when examining larger specimens or when you need to move the specimen to view different parts of it.
The Stage: Where the Specimen Is Placed
When preparing to use a microscope, one of the key components to consider is the stage, where the specimen is carefully positioned for observation. The stage is a flat platform located beneath the objective lenses and above the light source. It’s designed to hold the specimen securely in place during examination.
The stage typically has two adjustable stage control knobs that allow you to move the specimen horizontally and vertically. These knobs enable you to position the specimen precisely under the objective lenses for optimal viewing. Additionally, the stage may also have a mechanical stage, which provides more precise control over the movement of the specimen. This is especially useful when examining multiple areas of the specimen or when conducting experiments that require specific positioning.
Some stages also have a specimen holder or clips to secure slides or other types of specimens.
The Aperture: Allowing Transmitted Light
Now it’s time to learn about the aperture, an important part of the microscope that allows transmitted light to pass through.
The aperture is essentially a hole in the microscope stage, through which light can enter and illuminate the specimen.
By controlling the aperture, you can regulate the amount of light that reaches the specimen, ensuring optimal visibility and clarity during observation.
Understanding how to adjust the aperture is crucial for obtaining clear and well-illuminated images under the microscope.
Light Control Mechanism
The aperture in a microscope is a crucial component that allows transmitted light to pass through, enabling clearer visualization of the specimen. It’s located on the stage, typically near the condenser and iris diaphragm.
The aperture controls the amount of light that reaches the specimen, helping to create a well-illuminated image. By adjusting the size of the aperture, you can regulate the intensity of the transmitted light. Opening the aperture wider allows more light to pass through, while closing it reduces the amount of light.
This light control mechanism is important because it helps optimize the image quality and contrast of the specimen. By adjusting the aperture, you can ensure that the specimen is properly illuminated for accurate observation and analysis.
Illumination Regulation
To regulate the illumination of the microscope, the aperture controls the amount of transmitted light that reaches the specimen. The aperture is a hole located in the microscope stage and is responsible for allowing light to pass through.
By adjusting the size of the aperture, you can control the intensity of the transmitted light. This is important because different specimens require different levels of illumination for optimal visibility. Opening the aperture allows more light to pass through, resulting in a brighter image, while closing it reduces the amount of light, resulting in a dimmer image.
Additional Parts: Illuminator, Condenser, and Diaphragm
Now let’s focus on the additional parts of a microscope that play a crucial role in lighting the specimen and controlling the light intensity.
These parts include the illuminator, condenser, and diaphragm. The illuminator provides the light source for the microscope, while the condenser focuses the light onto the specimen. The diaphragm, on the other hand, controls the amount of light passing through the condenser.
Understanding the functions of these parts is essential for optimizing the clarity and visibility of your specimen.
Lighting the Specimen
To effectively illuminate the specimen during microscopy, the illuminator, condenser, and diaphragm play a crucial role.
The illuminator is the light source of the microscope, providing the necessary light to view the specimen. It’s usually located at the base of the microscope and can be controlled using a light switch and brightness adjustment.
The condenser focuses the light onto the specimen, ensuring a clear and well-lit image. It’s positioned beneath the stage and can be adjusted to control the intensity of the light.
The diaphragm, also located beneath the stage, controls the amount of light passing through the condenser. By adjusting the diaphragm, you can regulate the brightness and contrast of the specimen, allowing for better visualization and analysis.
Controlling Light Intensity
The control of light intensity in a microscope is facilitated by the additional parts known as the illuminator, condenser, and diaphragm.
The illuminator is responsible for providing the light source for the microscope. It can be controlled using a light switch and brightness adjustment to adjust the intensity of the light.
The condenser focuses the light onto the specimen, ensuring that it’s evenly illuminated.
Lastly, the diaphragm, also known as the iris diaphragm, controls the amount of light passing through the condenser. By adjusting the diaphragm, you can regulate the amount of light reaching the specimen, allowing you to optimize the contrast and clarity of the image.
These additional parts play a crucial role in controlling light intensity and enhancing the quality of your microscopic observations.
Mechanical Stage for Slide Control
The mechanical stage of a microscope allows you to precisely control the movement of slides for easier viewing and analysis. It consists of two knobs, the X-axis knob and the Y-axis knob, which allow you to move the slide horizontally and vertically. This helps you to navigate the slide and position it exactly where you want it for observation.
The mechanical stage also has a stage clip or slide holder that holds the slide in place, preventing it from moving during observation. This is especially useful when working with delicate or valuable slides that need to be handled with care.
By using the mechanical stage, you can smoothly and accurately move the slide without disturbing the specimen or losing focus. This is essential for detailed examination and analysis of the specimen.
Rack Stop: Limiting Stage Movement
As we continue our exploration of microscope parts and functions, let’s now turn our attention to the rack stop, an important feature that helps to limit the movement of the stage.
The rack stop is a mechanism found in the mechanical stage of a microscope. Its primary function is to prevent the stage from moving too far and potentially damaging the specimen or the objective lenses. By setting the rack stop, you can control the maximum distance the stage can travel in both the X and Y directions.
This is particularly useful when you need to maintain focus on a specific area of the specimen or when you want to align different regions of interest. The rack stop is typically adjusted using a small knob or lever located on the side of the microscope stage.
Light Switch and Brightness Adjustment
To control the lighting of the microscope, you can use the light switch and brightness adjustment.
The light switch is an electrical control device that allows you to turn the illuminator on and off. By toggling the light switch, you can easily control the light source of the microscope.
The brightness adjustment, on the other hand, is used to control the intensity or brightness of the light bulb. It allows you to adjust the lighting according to your needs and preferences. By increasing or decreasing the brightness, you can enhance the visibility of the specimen and ensure optimal viewing conditions.
This feature is particularly useful when working with specimens that require specific lighting conditions. Whether you need a brighter or dimmer light, the brightness adjustment provides you with the flexibility to adjust the lighting to suit your requirements.
Conclusion
In conclusion, understanding the different parts of a microscope and their functions is essential for anyone interested in studying the microscopic world.
From the structural components that support the microscope to the optical parts that enhance image quality, each part plays a crucial role in the overall functioning of the microscope.
By familiarizing yourself with these components, you’ll be able to manipulate specimens and focus on specific areas of interest.
So dive into the microscopic realm armed with this knowledge and explore the wonders that await!

Erzsebet Frey (Eli Frey) is an ecologist and online entrepreneur with a Master of Science in Ecology from the University of Belgrade. Originally from Serbia, she has lived in Sri Lanka since 2017. Eli has worked internationally in countries like Oman, Brazil, Germany, and Sri Lanka. In 2018, she expanded into SEO and blogging, completing courses from UC Davis and Edinburgh. Eli has founded multiple websites focused on biology, ecology, environmental science, sustainable and simple living, and outdoor activities. She enjoys creating nature and simple living videos on YouTube and participates in speleology, diving, and hiking.