
To perform a Gram stain, you'll need clean slides, bacterial cultures, and essential reagents like crystal violet, Gram's iodine, decolorizer, and safranin. Start by preparing a thin bacterial smear on a slide and heat-fixing it. Apply crystal violet for 60 seconds, then Gram's iodine for a minute. Decolorize briefly with ethanol or acetone, and counterstain with safranin. After drying, examine the slide under a microscope with oil immersion. Gram-positive bacteria appear purple, while Gram-negative bacteria look pink or red. This technique is fundamental for initial bacterial identification, but there's more to discover about its significance in microbiology.
Materials and Equipment Required

A well-stocked laboratory bench is vital for successful Gram staining. You'll need several key items to perform this important microbiological technique. First, make certain you have clean glass microscope slides and a supply of bacterial cultures for staining. You'll also require a Bunsen burner or slide warmer for heat-fixing your samples.
For the staining process, you'll need four essential reagents: crystal violet (primary stain), Gram's iodine (mordant), decolorizer (typically 95% ethanol or acetone), and safranin (counterstain). Confirm these are fresh and properly stored to maintain their effectiveness.
You'll also need several pieces of equipment. A microscope with oil immersion capability is key for observing the stained bacteria at high magnification. Don't forget immersion oil for this purpose. You'll need droppers or pipettes for applying the stains and rinse bottles filled with distilled water for washing the slides between steps.
Other necessary items include lens paper for cleaning your microscope, paper towels or bibulous paper for blotting slides, and a timer to guarantee accurate staining intervals. A staining rack or slide holder can be helpful for processing multiple samples simultaneously.
Safety equipment is also vital. You should have personal protective equipment (PPE) such as lab coats, gloves, and safety goggles. A biohazard container for disposing of contaminated materials and a sink for handwashing are also necessary.
Lastly, don't forget to have a lab notebook and pen handy for recording your observations and results. With these materials and equipment at your disposal, you'll be well-prepared to perform accurate Gram staining procedures.
Preparing the Bacterial Smear
With your materials and equipment ready, let's begin the Gram staining process by preparing the bacterial smear. First, you'll need to obtain a clean, grease-free glass slide. Label it with the specimen details using a pencil or etching tool.
Next, transfer a small amount of the bacterial culture onto the slide. If you're working with a liquid culture, use a sterile loop to place a single drop on the slide. For solid cultures, add a drop of sterile water to the slide first, then use the loop to transfer a small amount of bacteria into the water droplet.
Using the inoculating loop, spread the bacterial suspension evenly over a 1-2 cm area on the slide. Create a thin, uniform layer to guarantee proper staining. Allow the smear to air dry completely at room temperature. This usually takes about 5-10 minutes.
Once dry, you'll need to heat-fix the smear. Pass the slide through a Bunsen burner flame 2-3 times, with the smear side up. Be careful not to overheat the slide, as this can damage the bacterial cells. Alternatively, you can use a slide warmer set to 50-55°C for 5-10 minutes.
After heat-fixing, allow the slide to cool to room temperature. This step is important for preserving the bacterial cell structure and adhering the smear to the slide. Your bacterial smear is now ready for the staining procedure.
Remember to handle the slide carefully throughout this process to avoid contamination or damage to the smear. Proper preparation of the bacterial smear is essential for accurate Gram staining results.
Applying Primary Stain
Now that your bacterial smear is prepared, it's time to apply the primary stain. The primary stain in Gram staining is crystal violet, a basic dye that imparts a purple color to all bacteria. To begin, you'll need to flood the slide with crystal violet solution.
Hold the slide at a slight angle and use a dropper or pipette to add crystal violet until it covers the entire smear. Let the stain sit on the slide for 60 seconds. This allows enough time for the dye to penetrate the cell walls of the bacteria.
After 60 seconds, gently rinse the slide with a stream of distilled water. Be careful not to aim the water directly at the smear, as this could wash away your sample. Instead, tilt the slide and let the water flow over it from the top. Continue rinsing until the excess stain has been removed and the water runs clear.
Next, you'll need to blot the slide dry. Don't wipe it, as this could remove the stained bacteria. Instead, use absorbent paper or a paper towel to gently press against the back of the slide, allowing capillary action to draw off excess moisture.
It's essential to maintain proper timing throughout this process. Oversaturating the slide with crystal violet or leaving it on for too long can lead to overstaining, while insufficient staining time may result in poor differentiation between Gram-positive and Gram-negative bacteria.
Mordant Application
Moving on to the mordant application, you'll need to apply iodine solution to your stained slide. This step is essential in the Gram staining process as it helps to fix the primary stain to the bacterial cell walls. You'll use Gram's iodine, which consists of iodine and potassium iodide in water.
To apply the mordant, gently flood the slide with Gram's iodine solution. Make certain it covers the entire smear area. Allow the iodine to sit on the slide for about 1 minute. During this time, the iodine interacts with the crystal violet stain, forming a large complex that's too big to pass through the cell walls of Gram-positive bacteria.
After the minute has passed, tilt the slide and carefully rinse off the excess iodine with a gentle stream of water. Be careful not to wash away your sample. At this point, all bacteria will appear purple-black due to the crystal violet-iodine complex.
It's important to note that timing is vital in this step. Leaving the mordant on for too long or too short a time can affect the final results of your Gram stain. If you're staining multiple slides, you can work in batches, but make certain you keep track of the timing for each slide.
Decolorization Step
After applying the mordant, you'll proceed to the decolorization step, which is vital in differentiating between Gram-positive and Gram-negative bacteria. This step involves using a decolorizing agent, typically ethanol or acetone, to remove the primary stain from certain bacterial cells.
To begin, you'll gently flood the slide with the decolorizing agent. It's essential to time this step carefully, as over-decolorization can lead to false results. For most applications, you'll want to expose the slide to the decolorizer for about 10-15 seconds. However, the exact timing may vary depending on the thickness of your smear and the specific decolorizer you're using.
During this process, Gram-negative bacteria will lose their purple color as the crystal violet-iodine complex is washed out of their cell walls. In contrast, Gram-positive bacteria retain the purple stain due to their thicker peptidoglycan layer.
You'll know it's time to stop decolorizing when the runoff liquid appears colorless. At this point, you should quickly rinse the slide with distilled water to halt the decolorization process. Be careful not to over-rinse, as this could potentially remove too much stain from Gram-positive bacteria.
It's important to note that the decolorization step is often considered the most vital and challenging part of the Gram staining procedure. Mastering this step through practice and careful observation will greatly enhance the accuracy and reliability of your Gram stain results.
Counterstaining Process
In light of the decolorization step, you'll proceed to the counterstaining process. This final stage of Gram staining is essential for distinguishing between Gram-positive and Gram-negative bacteria. You'll use a contrasting dye, typically safranin or basic fuchsin, which will stain Gram-negative bacteria pink or red.
To begin counterstaining, you'll apply the counterstain solution to the decolorized slide for about 30 seconds. This step guarantees that Gram-negative bacteria, which lost their initial crystal violet stain during decolorization, will now be visible under the microscope. Gram-positive bacteria, having retained the crystal violet, won't be affected by the counterstain.
After applying the counterstain, you'll gently rinse the slide with water to remove excess dye. Be careful not to wash away the bacteria. Then, you'll blot the slide dry using bibulous paper or allow it to air dry. It's important not to rub the slide, as this can damage the specimen.
Once the slide is dry, you're ready for microscopic examination. Under oil immersion, you'll observe Gram-positive bacteria appearing purple or blue-black, while Gram-negative bacteria will be pink or red. This color difference is due to the structural variations in bacterial cell walls.
Microscopic Examination and Interpretation
The final step in the Gram staining procedure is microscopic examination and interpretation. After you've completed the staining process, you'll need to examine the slide under a microscope to identify and classify the bacteria present.
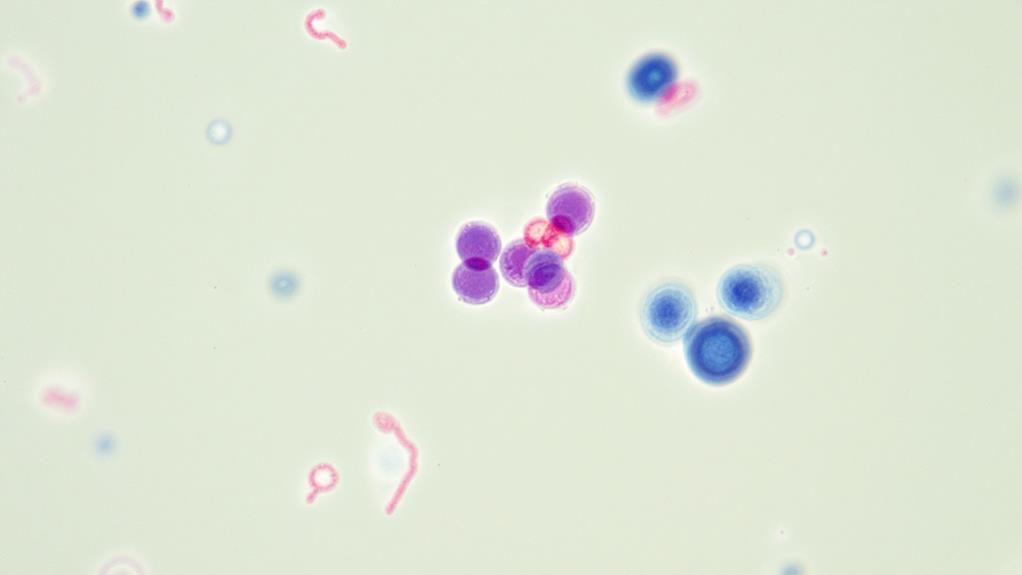
Begin by placing a drop of immersion oil on the stained area of the slide. Use the 100x oil immersion objective lens for the most detailed view. As you observe the slide, you'll notice that Gram-positive bacteria appear purple or blue-violet, while Gram-negative bacteria appear pink or red.
When interpreting the results, pay attention to both the color and morphology of the bacteria. Gram-positive cocci often appear in clusters, chains, or pairs, while Gram-negative bacilli may be rod-shaped or curved. You should also note any variations in size or arrangement within bacterial populations.
It's important to examine multiple fields of view to ascertain a representative sample. Count the number of Gram-positive and Gram-negative bacteria in each field, and calculate the ratio to determine the predominant type.
Be aware of potential artifacts or contamination that could affect your interpretation. Overdecolorized Gram-positive bacteria may appear Gram-negative, while underdecolorized Gram-negative bacteria might retain crystal violet and appear Gram-positive.
If you're unsure about your observations, consult reference materials or seek a second opinion from an experienced microbiologist. Remember that Gram staining is just one tool in bacterial identification, and additional tests may be necessary for a definitive diagnosis.

Erzsebet Frey (Eli Frey) is an ecologist and online entrepreneur with a Master of Science in Ecology from the University of Belgrade. Originally from Serbia, she has lived in Sri Lanka since 2017. Eli has worked internationally in countries like Oman, Brazil, Germany, and Sri Lanka. In 2018, she expanded into SEO and blogging, completing courses from UC Davis and Edinburgh. Eli has founded multiple websites focused on biology, ecology, environmental science, sustainable and simple living, and outdoor activities. She enjoys creating nature and simple living videos on YouTube and participates in speleology, diving, and hiking.